ColdCopy Help Manual
Contents
- Requirements & what you need
- First launch & granting permissions
- Connecting a drive (USB & SMB)
- Running your first backup
- Choosing what to back up
- Contacts & calendar export
- Live Activity & Dynamic Island
- Verifying backup integrity
- Backup history
- Browsing files on the drive
- Home screen widget
- Free vs Pro
- Settings reference
- Troubleshooting
- FAQ
1. Requirements & what you need
ColdCopy is a hardware-connected backup app. Before you start, make sure you have:
iOS 16+ or Android 10+
Works on any iPhone running iOS 16.0 or later, or any Android phone running Android 10 or later with USB OTG support.
USB cable or adapter
iPhone 15+: plug in directly via USB-C. Older iPhones: Lightning to USB 3 Camera Adapter. Android: USB-C to USB-A/C OTG adapter or cable.
Formatted drive
exFAT or FAT32 format required for USB drives. NTFS is read-only on iPhone and Android — you must reformat it first.
SMB share (optional)
ColdCopy also backs up to network drives. Your NAS or shared Mac folder must be on the same Wi-Fi network.
Compatible drive formats
| Format | iOS & Android | Works with ColdCopy |
|---|---|---|
| exFAT | Read & Write | Yes — recommended |
| FAT32 | Read & Write | Yes (4 GB per file limit) |
| APFS | Read & Write | Yes (Apple devices only) |
| HFS+ | Read & Write | Yes (Apple devices only) |
| NTFS | Read only | No — must reformat |
Recommendation: Format your backup drive as exFAT. It works natively on iPhone, Mac, and Windows with no file-size limit. See the NTFS & iPhone guide if your drive is NTFS.
2. First launch & granting permissions
When you open ColdCopy for the first time, an onboarding screen introduces the app. Swipe through the slides and tap Get started to reach the Home screen. The experience is the same on iOS and Android — screenshots below show iOS.
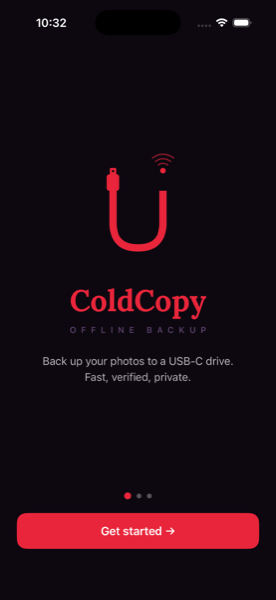
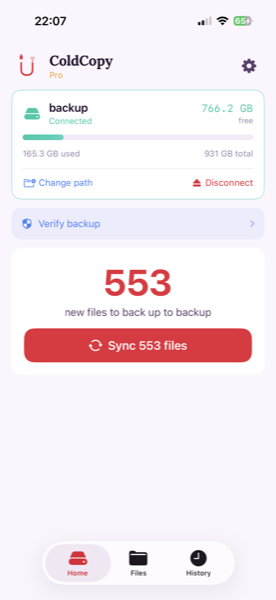
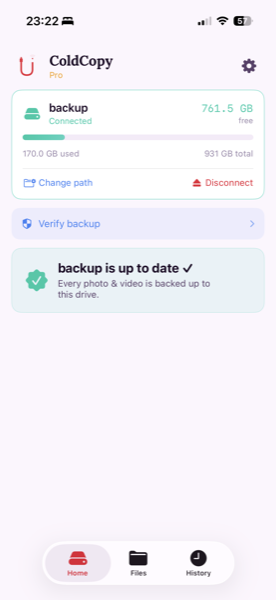
Photo library access
ColdCopy needs access to your photo library to count which photos haven't been backed up yet. When prompted, grant full access for the best experience.
If you chose limited access or denied it, you can change it any time:
- Open your phone's Settings
Tap the Settings icon on your home screen.
- iOS: Privacy & Security → Photos → ColdCopy
Select All Photos.
- Android: Apps → ColdCopy → Permissions → Photos / Media
Select Allow or Allow all the time.
3. Connecting a drive
USB drive
- Plug in your drive
iPhone 15+: connect directly via USB-C. Older iPhones: use a Lightning to USB 3 Camera Adapter. Android: use a USB-C OTG adapter or OTG cable to attach the drive.
- Open ColdCopy
The app scans automatically. You'll briefly see a Detecting drive… spinner.
- Drive appears in the card
The drive name, total size, and free space are shown. ColdCopy is ready to back up.
If the drive isn't detected automatically, tap Detect Drive. If it still doesn't appear, tap Select Manually in the alert and pick your drive in the Files browser.
SMB / Network drive (NAS or shared folder)
- iOS — mount via the Files app
Tap Browse → three-dot menu → Connect to Server. Enter
smb://192.168.x.x/sharenameand authenticate. - Android — mount via a file manager
Use a file manager that supports SMB (e.g. the built-in My Files on Samsung, or Solid Explorer). Connect to your NAS share so it appears as a location.
- Return to ColdCopy and tap Detect Drive
ColdCopy finds the mounted share and connects to it.
Multiple backup locations: If you've previously backed up to different folders on the same drive, ColdCopy asks you to choose. Pick an existing folder or tap Choose a new location to start fresh.
4. Running your first backup
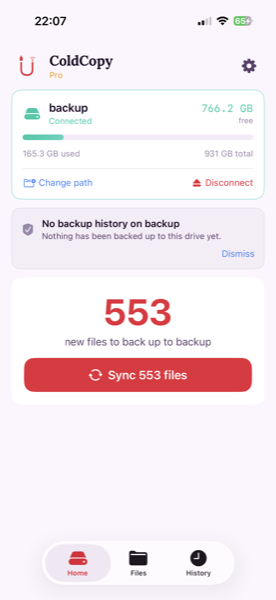
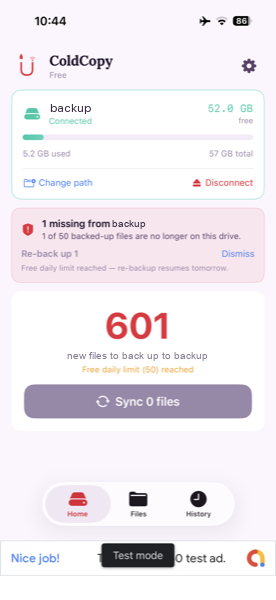
Once a drive is connected, the Home screen shows how many photos haven't been backed up yet. Every run is incremental — previously transferred files are never duplicated.
- Check the new file count
The large number on the Home screen is photos and videos not yet on this drive.
- Tap "Sync N files"
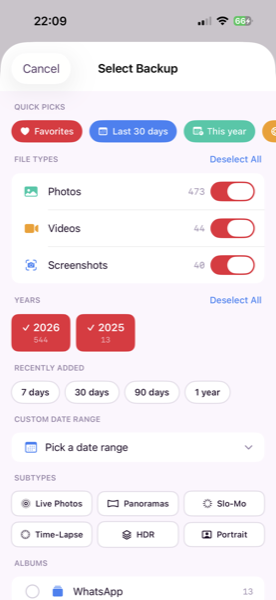
This opens the Backup Selection sheet where you can refine exactly what gets transferred.
- Configure your selection (optional)
By default everything new is selected. You can filter by year, media type, album, date range, or hand-pick individual photos.
- Tap "Sync N files" at the bottom
The transfer starts. You'll see live progress: file name, speed, and ETA.
- Review the result
A summary shows verified, skipped, and failed counts. Tap View transfer details to see every file's SHA-256 checksum status, then Done to return home.
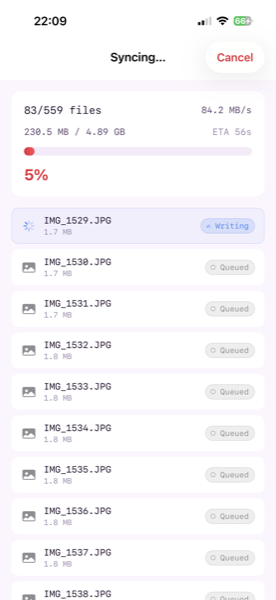
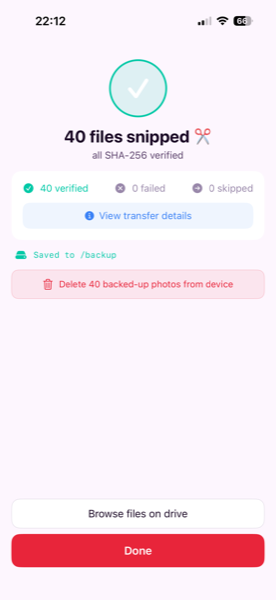
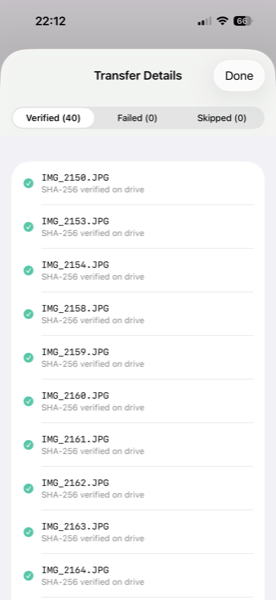
Incremental backups: ColdCopy remembers every file it has ever transferred. Re-running backup only copies new files — nothing is ever duplicated on the drive.
After the backup — optional cleanup
After a successful transfer, ColdCopy shows a "Delete backed-up photos from device" option. This lets you free up phone storage by removing files that are now safely on the drive. All files are SHA-256 verified before the delete option appears — it will not offer to delete anything that failed to transfer.
5. Choosing what to back up
The Backup Selection sheet gives you precise control over which files are transferred.
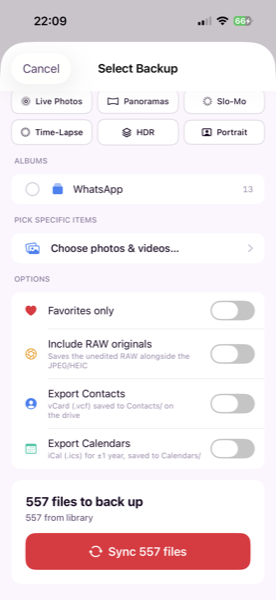
Quick Picks
One-tap presets: Favourites, Last 30 days, This year. Great for a focused backup without digging into filters.
File Types
Toggle Photos, Videos, and Screenshots independently. Useful for skipping large videos or doing a screenshots-only backup.
By Year
Tap one or more year chips to limit the backup. Each chip shows the file count for that year.
Recently Added
Quickly pick 7 days, 30 days, 90 days, or 1 year. Overrides year chips when active.
Custom Date Range
Tap Pick a date range to set a precise start and end date — useful for backing up a specific trip or event.
Albums
Filter to a specific album (Favourites, WhatsApp, Trips, etc.). Combined on top of the date filter.
Subtypes
Fine-tune with Live Photos, Panoramas, Slo-Mo, Time-Lapse, HDR, and Portrait — include or exclude each independently.
Hand-pick files
Tap Choose photos & videos… to open a grid and select individual assets. This overrides all other filters.
Filter precedence
- Hand-picked assets — overrides everything once you've made a selection in the picker.
- Custom date range — overrides year chips and Recently Added when active.
- Recently Added — overrides year chips when active.
- Year chips — base date filter when nothing else is set.
- Albums + subtypes — applied on top of the date result.
6. Contacts & calendar export
ColdCopy can export your contacts and calendar events alongside photos — all in standard, cross-platform formats.
How to export
- Open Backup Selection
Tap Sync N files on the Home screen.
- Scroll to Options and toggle on
Export Contacts saves a vCard (.vcf) file. Export Calendars saves an iCalendar (.ics) file. Each requires a one-time permission grant.
- Tap Sync
Contacts and calendars are exported first, then photos are copied. All files land in the same backup folder on the drive.
Output files
| Data | File | Opens with |
|---|---|---|
| Contacts | contacts.vcf | macOS Contacts, Outlook, Gmail, Google Contacts |
| Calendars | calendars.ics | Apple Calendar, Google Calendar, Outlook, Thunderbird |
Both files are updated (overwritten) on each backup run and are placed in the root of your ColdCopy backup folder on the drive.
7. Live Activity & Dynamic Island
Once a backup starts you can leave the app and track progress without keeping ColdCopy open. On iOS, progress appears in the Dynamic Island (iPhone 14 Pro and later) and on the Lock Screen. On Android, a persistent notification in the notification shade shows the current file and percentage.
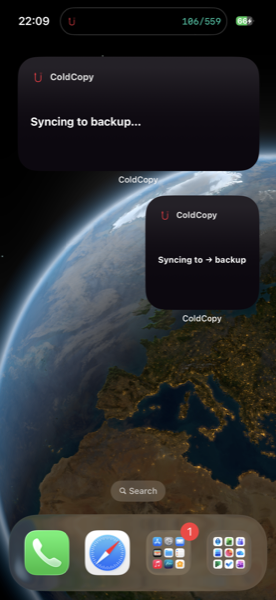
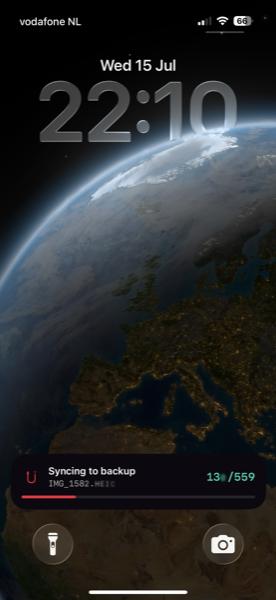
The Live Activity updates in real time showing the current file name and count. When the backup completes, the activity switches to a Backup complete message and fades after a few seconds.
8. Verifying backup integrity
ColdCopy can check whether every file it recorded as backed up is actually still present on the drive. This is useful after reorganising files on the drive or if you suspect accidental deletion.
- Connect the drive
The drive you want to verify must be connected.
- Tap "Verify backup" on the Home screen
The bar appears below the drive card once a drive is connected and photo access is granted.
- Wait for the scan
ColdCopy checks every backed-up file record against what's physically on the drive.
- Review the result
All present → green. Missing files → red with a count and a Re-back up button.
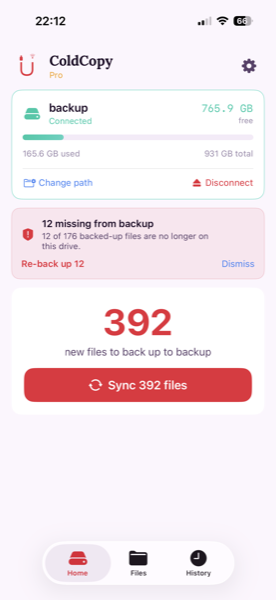
Tapping Re-back up N starts a targeted transfer of exactly the missing files — no need to re-run a full backup. The missing count is preserved accurately even under the Free daily cap, so repeated verifications always reflect the true state of the drive.
9. Backup history
Every transfer session is logged in the History tab. Tap any entry to see a full per-file breakdown including SHA-256 checksums.
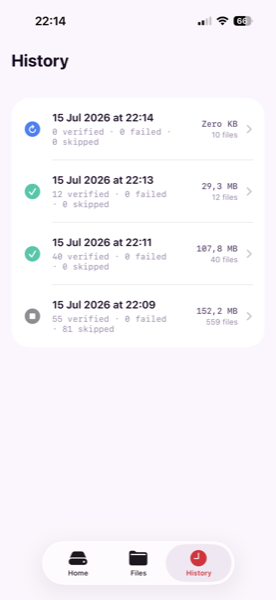
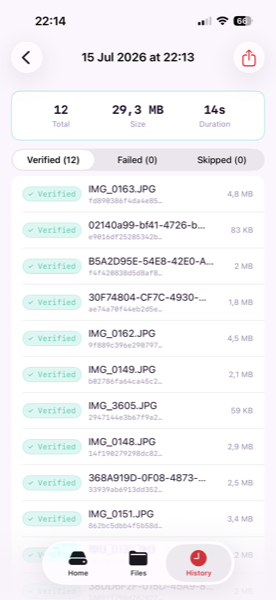
Each entry shows total files, data transferred, and duration. Tap Verified, Failed, or Skipped tabs in the detail view to filter by status. Skipped files are duplicates that were already on the drive.
10. Browsing files on the drive
The Files tab lets you browse everything ColdCopy has saved to the connected drive without leaving the app.
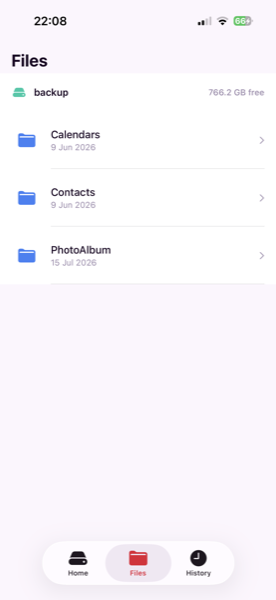
The folder structure mirrors how ColdCopy organises your backup:
- PhotoAlbum/ → photos and videos, organised by year then date
- Contacts/ →
contacts.vcfexport - Calendars/ →
calendars.icsexport
Tap any folder to navigate into it. Tap an image to preview it full screen. The drive's free space is shown at the top of the tab.
11. Home screen widget
Add the ColdCopy widget to see at a glance how many photos are waiting to be backed up, and tap to start a backup immediately.
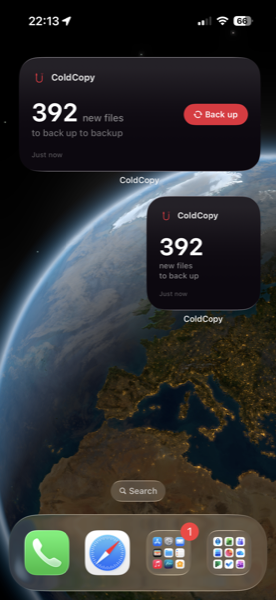
Adding the widget
- Long-press the home screen
Tap the + button in the top-left corner to open the widget gallery.
- Search for ColdCopy
Type "ColdCopy" in the search bar at the top.
- Choose a widget size and tap Add Widget
The large widget shows a count + Back up button. The small widget shows the count and last backup time.
What the widget shows
- Number of photos not yet backed up to the last-used drive.
- The last-used drive name.
- When the last backup ran (Just now, 3 hours ago, etc.).
12. Free vs Pro
ColdCopy is free to download. ColdCopy Pro is a one-time in-app purchase — no subscription, no recurring charges.
| Feature | Free | Pro |
|---|---|---|
| Photo & video backup | 50 files / day | Unlimited |
| Contacts export | Yes | Yes |
| Calendar export | Yes | Yes |
| USB & SMB drives | Yes | Yes |
| Integrity verification | Yes | Yes |
| Widget & Live Activity | Yes | Yes |
| Ads | Banner shown | None, ever |
| Price | Free | $1.99 one-time |
Upgrading to Pro
- Open Settings
Tap the gear icon on the Home screen.
- Tap "Upgrade to Pro"
The upgrade card is shown at the top of Settings if you're on the Free tier.
- Confirm the purchase
On iOS, review the price and authorise with Face ID or Touch ID. On Android, confirm in the Google Play sheet using your Google account.
Restoring a purchase
If you bought Pro on another device or reinstalled the app, go to Settings → Restore Purchases. ColdCopy checks your App Store (iOS) or Google Play (Android) entitlements and re-enables Pro immediately — no charge.
13. Settings reference
Appearance
Choose Dark, Light, or Auto (follows the iOS system setting). Takes effect immediately.
Photo access
Shows the current permission status. Tap to open the in-app guide. On iOS it links to Settings → Privacy → Photos → ColdCopy. On Android it opens the app's permission settings directly.
Notifications
| Setting | Default | What it does |
|---|---|---|
| Transfer complete | On | Notifies you when a backup finishes — useful when you've left the app. |
| Drive full warning | On | Warns when the connected drive has less than 1 GB free. |
| Weekly reminder | Off | Sends a reminder to back up on a chosen day of the week. |
HEIC conversion (iOS only)
Controls how HEIC photos are saved to the drive on iOS:
- Keep as HEIC (default) — saves the original file. Smallest size. Opens on macOS, iOS, and Windows 10+.
- Convert to JPEG — converts before copying. Larger files, but universally compatible with older software.
On Android, photos are saved in their native format (JPEG, HEIC, or WebP depending on the device).
My Drives
Lists every drive ColdCopy has ever connected to, with a backed-up file count per drive. From here you can:
- Rename a drive — changes the display name used across the app and widget.
- Forget a drive — removes the drive record from ColdCopy's database. Files on the drive are untouched; ColdCopy will treat it as a brand-new drive next time you connect it.
14. Troubleshooting
Drive not detected
- Disconnect and reconnect the drive, then tap Detect Drive.
- Try a different USB adapter — some cheap adapters don't support write operations or carry enough current.
- Make sure no other app (Files, a photo importer) has the drive locked open.
- If the drive still doesn't appear, tap Select Manually in the alert and navigate to the drive in the Files picker.
Drive appears as read-only / can't save backup
This is almost always an NTFS drive. iPhones and Android phones cannot write to NTFS. Reformat to exFAT. See the NTFS & mobile guide for step-by-step instructions using Disk Utility on Mac or File Explorer on Windows.
Backup count stuck at zero after connecting
- Check that photo access is set to All Photos in iOS Settings → Privacy & Security → Photos → ColdCopy.
- Tap the amber banner on the Home screen (if visible) and follow the prompts.
Backup is slower than expected
- USB drive write speed depends on the drive and adapter quality. A branded USB-C SSD with the original cable is fastest.
- iCloud-optimised photos must download to the device before copying. If your library has many iCloud placeholders, the transfer pauses briefly for each download.
- Videos — especially 4K or ProRes — are very large. A single 4K ProRes clip can be several gigabytes.
SMB connection fails
- Make sure your phone and the NAS/Mac are on the same Wi-Fi network.
- Verify the address format:
smb://192.168.1.x/sharename(no trailing slash). - The connected user must have read and write access on the share.
- Some routers block SMB. Try enabling "Use SMB 1" in your NAS settings if modern SMB fails.
Files showing as Failed in the log
An error means the file couldn't be read or written at transfer time. Common causes: iCloud placeholder didn't download in time (it will retry next backup), drive ran out of space, or a file system permission issue on the drive.
Pro purchase not applying after restore
Go to Settings → Restore Purchases. If Pro still doesn't activate after a successful restore, force-quit ColdCopy and reopen it. If the issue persists, email contact@lidavi.com with your Apple ID and we'll help.
Still stuck? Email contact@lidavi.com with your phone model, OS version (iOS or Android), and a description of the issue. We reply within one business day.
15. FAQ
Does ColdCopy upload my photos anywhere?
No. Files are copied directly from your phone to the connected drive. Nothing leaves your device except to the drive you choose. See the Privacy Policy for the full technical details.
Can I back up to multiple drives?
Yes. ColdCopy tracks backed-up files per drive independently. Connect any drive and it picks up exactly where it left off for that drive.
What happens to files I've deleted from my phone?
ColdCopy only copies files at backup time. It never deletes files from the drive when you delete them from your phone. Your drive retains everything it received.
What is the .coldcopy folder on my drive?
ColdCopy creates a hidden .coldcopy/ folder in your backup destination to store a manifest. The manifest contains file names, sizes, and checksums — not file contents. It powers incremental backups and integrity checks. Do not delete it.
Does ColdCopy back up Live Photos?
Yes. Each Live Photo is saved as a HEIC (or JPEG if conversion is on) + MOV pair, preserving both the still image and the motion component.
Can I use ColdCopy on iPad?
ColdCopy is designed for iPhone and Android phones. It also runs on iPad (via iPhone compatibility on iOS). All features work identically across supported devices.
Is Pro a subscription?
No. Pro is a single one-time purchase. Pay once, own it forever across all your devices on the same Apple ID (iOS) or Google account (Android). No recurring charges, no expiry.
What happens to my backup if I delete ColdCopy?
Files on the drive are untouched — deleting the app has no effect on the drive. Only the local database (which tracks what's been transferred) is removed with the app. If you reinstall, ColdCopy rebuilds its history from the manifest file stored on the drive.
Can I use ColdCopy to free up phone storage?
Yes. After a successful backup, the transfer complete screen offers a Delete backed-up photos from device option. All files are SHA-256 verified before this option appears — it will not offer to delete anything that wasn't confirmed on the drive.
Still have a question? We're happy to help.
contact@lidavi.com